Setting Up Kubernetes Locally: A Developer Guide

Kubernetes has become the de facto standard for deploying, scaling, and managing containerized applications. While often associated with large-scale cloud deployments, having a local Kubernetes setup is invaluable for developers. It allows you to test your applications in a production-like environment, experiment with K8s features, and streamline your development workflow without incurring cloud costs.
This guide will walk you through the process of setting up a developer-friendly Kubernetes environment on your local machine. We’ll focus on tools that are easy to install and use, providing practical examples to get you up and running quickly.
Why Local Kubernetes?
Before we dive into the “how,” let’s briefly touch on the “why”:
- Realistic Testing: Simulate your production environment closely, catching issues before deployment.
- Faster Feedback Loops: Quickly iterate on your application and observe its behavior within a Kubernetes context.
- Learn and Experiment: Explore Kubernetes concepts, commands, and YAML configurations without affecting production systems.
- Offline Development: Continue working on your K8s deployments even without an internet connection.
- Cost-Effective: Avoid cloud provider charges for development and testing.
Choosing Your Local Kubernetes Tool
Several excellent tools allow you to run Kubernetes locally. We’ll focus on the two most popular and developer-friendly options:
- Minikube: A lightweight Kubernetes implementation that creates a single-node cluster inside a virtual machine (VM) on your laptop. It’s simple, reliable, and great for learning.
- Docker Desktop (with Kubernetes): If you’re already using Docker Desktop, it includes a built-in Kubernetes cluster that’s incredibly convenient.
Both are excellent choices. If you’re new to Docker or prefer a more isolated K8s environment, Minikube is a fantastic starting point. If Docker Desktop is already your daily driver, its integrated K8s is a no-brainer.
Option 1: Minikube (Recommended for Newbies)
Minikube is designed for local Kubernetes development.
Prerequisites:
- kubectl: The Kubernetes command-line tool.
Installation Steps:
Install kubectl:
- macOS (Homebrew):
brew install kubernetes-cli - Windows (Chocolatey):
choco install kubernetes-cli - Linux (apt/yum): Refer to the official Kubernetes documentation for the latest instructions. (Example for Debian/Ubuntu):
sudo apt-get update && sudo apt-get install -y apt-transport-https ca-certificates curl
curl -s https://packages.cloud.google.com/apt/doc/apt-key.gpg | sudo gpg --dearmor -o /etc/apt/keyrings/kubernetes-archive-keyring.gpg
echo "deb [signed-by=/etc/apt/keyrings/kubernetes-archive-keyring.gpg] https://apt.kubernetes.io/ kubernetes-xenial main" | sudo tee /etc/apt/sources.list.d/kubernetes.list
sudo apt-get update
sudo apt-get install -y kubectl
- macOS (Homebrew):
Install Minikube:
- macOS (Homebrew):
brew install minikube - Windows (Chocolatey):
choco install minikube - Linux: Refer to the official Minikube documentation for the latest instructions. (Example for Debian/Ubuntu - amd64):
curl -LO https://storage.googleapis.com/minikube/releases/latest/minikube-linux-amd64
sudo install minikube-linux-amd64 /usr/local/bin/minikube
- macOS (Homebrew):
Start Minikube: Once
kubectlandminikubeare installed, start your cluster. Minikube will automatically detect a suitable hypervisor.minikube startThis command will download the necessary Kubernetes components and spin up a VM. This might take a few minutes the first time.
Verify the Installation: Check the status of your Minikube cluster:
minikube statusYou should see output indicating that
host,kubelet, andapiserverareRunning.Verify
kubectlis connected:kubectl cluster-infoThis will show the URLs for the Kubernetes control plane.
Option 2: Docker Desktop (for Docker Users)
If you already use Docker Desktop, enabling Kubernetes is incredibly straightforward.
Prerequisites:
- Docker Desktop: Ensure you have the latest version installed.
Installation Steps:
Enable Kubernetes in Docker Desktop:
- Open Docker Desktop settings (usually by clicking the Docker icon in your system tray/menu bar and selecting “Settings” or “Preferences”).
- Navigate to the “Kubernetes” tab.
- Check the “Enable Kubernetes” box.
- Click “Apply & Restart”.
Docker Desktop will then download and start the necessary Kubernetes components. This might take some time on the first activation.
Verify the Installation: Docker Desktop automatically configures
kubectlto point to its integrated cluster.kubectl cluster-infoYou should see information about the Docker Desktop Kubernetes cluster.
Your First Kubernetes Application (Hello World!)
Now that you have a local Kubernetes cluster, let’s deploy a simple “Hello World” application. We’ll use a pre-built Nginx image.
Create a Deployment: A Deployment describes the desired state for your application, including the Docker image to use and the number of replicas.
kubectl create deployment nginx-hello --image=nginx:latestThis command tells Kubernetes to create a Deployment named
nginx-hellousing thenginx:latestDocker image.Check Deployment Status:
kubectl get deploymentsYou should see
nginx-hellolisted with aREADYcount (e.g.,1/1).To see the Pods created by the Deployment:
kubectl get podsYou’ll see a Pod named something like
nginx-hello-xxxxx-yyyyywith aSTATUSofRunning.Expose the Deployment (Service): To access your Nginx application from outside the cluster, you need to expose it via a Service. We’ll use a
NodePortservice, which makes the application accessible on a specific port on your cluster node (Minikube VM or Docker Desktop host).kubectl expose deployment nginx-hello --type=NodePort --port=80This creates a Service named
nginx-hellothat exposes port80of the Nginx container as aNodePort.Get the Service URL:
Minikube: Minikube provides a convenient command to get the service URL:
minikube service nginx-hello --urlThis will output the URL (e.g.,
http://192.168.49.2:30xxx). Open this URL in your web browser, and you should see the Nginx welcome page.Docker Desktop: With Docker Desktop, the service is usually accessible on
localhostor127.0.0.1on the assigned NodePort. First, get the service details:kubectl get service nginx-helloLook for the
PORT(S)column. It will show something like80:3xxxx/TCP. The3xxxxis theNodePort. You can then access your Nginx application athttp://localhost:3xxxx.
Cleaning Up
To stop your Minikube cluster:
minikube stop
To delete your Minikube cluster completely (freeing up resources):
minikube delete
For Docker Desktop, you can disable Kubernetes in the settings, or simply stop the Docker Desktop application.
To delete your nginx-hello deployment and service:
kubectl delete service nginx-hello
kubectl delete deployment nginx-hello
Next Steps for Developers
Now that you have a local Kubernetes environment, here are some ideas for what to explore next:
- Explore kubectl: Dive deeper into
kubectlcommands. Usekubectl get,kubectl describe,kubectl logs,kubectl exec, andkubectl port-forwardto interact with your applications. - YAML Manifests: Instead of
kubectl create deploymentandkubectl expose, learn to write YAML files for your Deployments, Services, and other Kubernetes objects. This is how real-world applications are deployed. - Helm: A package manager for Kubernetes that simplifies deploying complex applications.
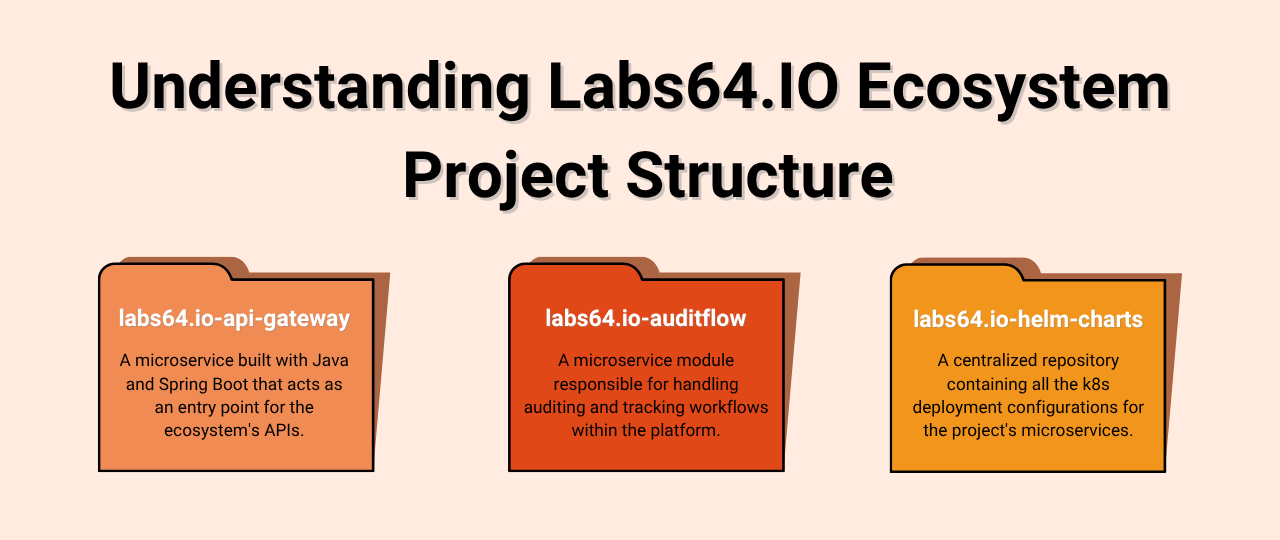
- Explore Labs64.IO Ecosystem: Use Labs64.IO Ecosystem helm charts repository and deploy it to your local Kubernetes cluster.
- Persistent Storage: Learn about
PersistentVolumesandPersistentVolumeClaimsto store data that persists beyond the lifetime of a Pod. - Ingress: Explore how to manage external access to services in a more robust way than NodePort, especially for multiple services.
- Dashboard: Both Minikube and Docker Desktop offer a Kubernetes dashboard for a visual overview of your cluster. For Minikube:
minikube dashboard. For Docker Desktop, it’s integrated into the UI.
Image Credits: Labs64.IO
Related Posts